Manual
Welcome to the Manual of Photo Mate. This document gives you explanation over most common tasks and settings.
View as PDF
File Import
This section covers how to get your images transfered to your device. This can be either by attaching the camera to your tablet or using cardreaders.
Connect Camera
- Connect your camera to your tablet
- If your tablet doesn't have a full-size usb port, use a "USB-Host Adapter Dongle".

- If your tablet does have a full-size usb-port, you can directly connect the camera to this port
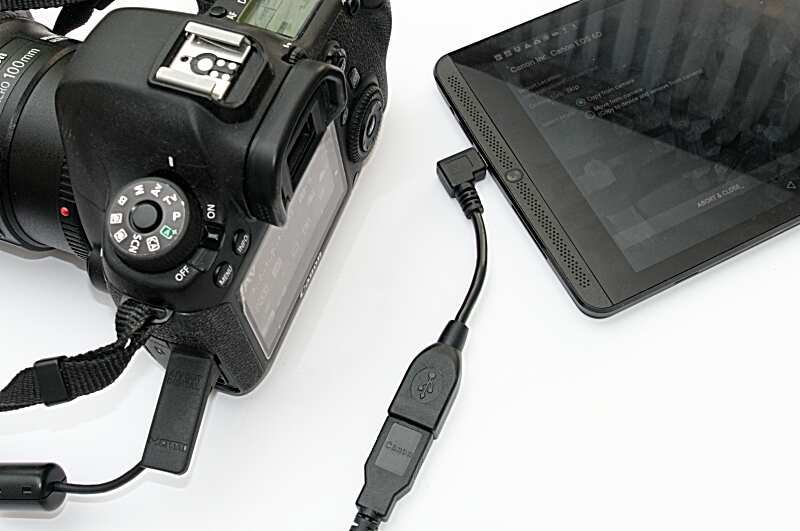
- In Photo Mate, go to Menu -> Camera-Import (or select the camera icon in the menu). If you get asked, grant Photo Mate permission to access your usb-device.
- Choose the Camera from the list of devices.
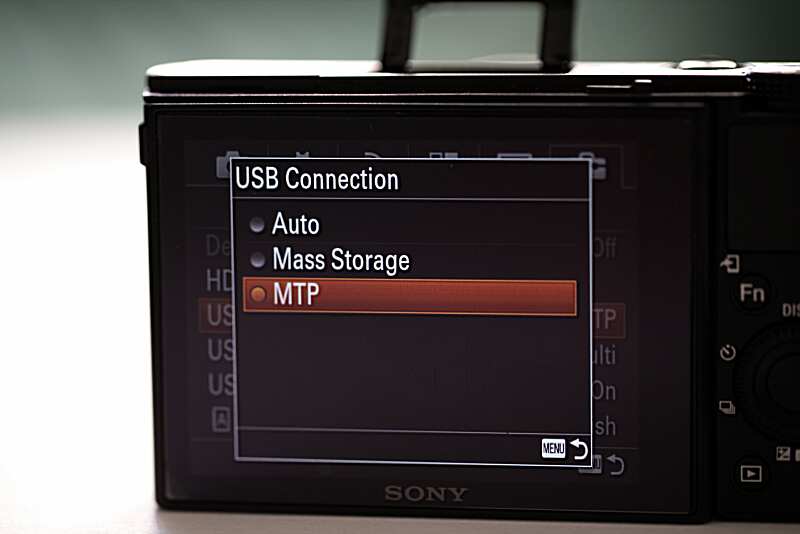
Troubleshooting:
- Make sure the camera is turned on
- Try turning the camera on and off if it's not detected
- Try a different usb-cable or USB-Host Adapter if possible
- Set a different transfer mode in your camera menu (should be set to "MTP")
Use Memory-Card
You can either use a Micro-SD to SD-Adapter and insert the Micro-SD card into it while shooting with your camera, and afterwards put the Micro-SD card into your tablet.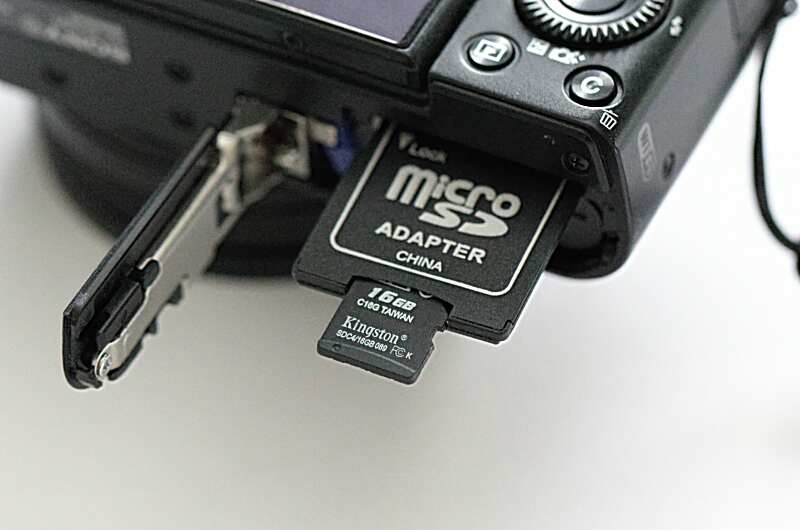
Or connect a SD- or CF- card-reader to your tablet using a "USB-Host Adapter Dongle".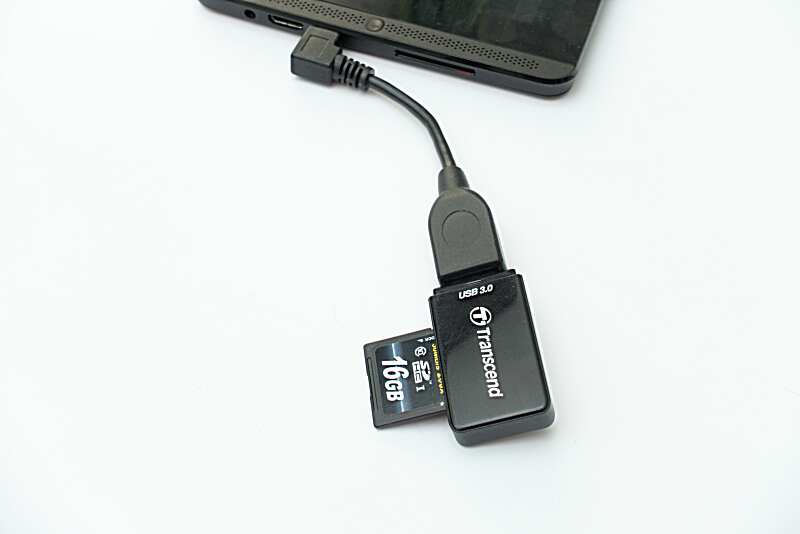
In Photo Mate, check the Storages list on the left. Press the refresh button. You should now see your external sd-card.
You can directly open and edit your images on your sd-card.
Throubleshooting:
- If you don't see the storage in Photo Mate, try to restart your device.
- Some devices (like Nexus) may not support this type of storage access.
Working with the importer
To access the importer, use the "Camera Import" button at the top.
The importer will ask for the source storage. This can be either an external sd-card or your connected camera.
Use the "Choose-Directory" option to set the Import-Location (where your files are imported to).
The "Set Filenames..." option can be used to rename the files on import. You can also create folder-structures like /year/month/image to group your images based on the exif date or current date while importing. Check the presets in the dialog for different samples.
You can Copy or Move (delete) the files from your camera storage.
Note: Some sources or cameras may not support moving. If the app freezes while importing, please use the copy mode instead.
Select "Start Import" to let Photo Mate load all the images available for import. You can now select which images you want to import.
Accessing storages directly
If you've connected a card-reader or insert a micro-sd card, you can also work directly on the storage and rate or edit files directly on the card.
Use the "Storages" Menu on the left side in the gallery to find your storage. Tap on it to open the storage.
Photo Mate may come up with a dialog for gathering write-access to the storage. Please follow the steps carefully!
Gallery
This section covers the basic features of the gallery.
The gallery allows you to easily browse and navigate through your images.
Navigation & Gestures
Single tap on images to open them in a full-view.
Single tap on folders to open this folder in the gallery
Long tap on folders to rename or remove them
Long tap on images to start a Multi-Select operation
Pinch-To-Zoom to change the size of your thumbnails.
Sidebar
Swipe from the left to open the sidebar.
The sidebar gives you access to favorite folders, image library, storages and your folder history.
Tap on "Add Folder" to add the current folder to your favorite folders.
Long-Tap on a favorite folder to change the name in the list or add a shortcut to your android launcher
Library
 |
The library is a virtual collection of all your images. Regardless in which folder your images are stored, the library can show all your image files. |
Further more, the library allows you to quickly filter images based on metadata, ratings and more.
When viewing images, these are automatically added to your library. To add a whole folder to your library, please read the following pages.
Access the Library
Open the sidebar in the gallery (Swipe from the left)
The first folder in your Favorite Places is the library. Tap on it to go to the library.
Add folder
Go to Menu -> Manage Library...
Choose "Add Folder".
Navigate to the folder you want to add. This folder, including all sub-folders, will be added to your library.
We recommend to just add folders where you actually manage your images. Adding the whole sdcard (/storage/emulated/0) to your library also adds a lot of unwanted images and icons from other apps
Library Details
Go to Menu -> Library Details
You'll see information about how much space the library is consuming, how many images are indexed.
You can Clean the library, which will remove all files which are not existing anymore on your storage.
You can Reset the library, which will remove all images and folders from your library.
Create Library View
You can save current filter settings as a quick access.
- In the library, set your filter settings you want to save
- Open the sidebar
- Under Favorites, choose "Add Folder"
- Enter a name for the filter setinngs
Shortcuts
Image View
The image view allows you to view your images in full-size.
Usage & Gestures
Swipe to the left or right to switch to the previous or next image
Pinch-To-Zoom to zoom in and out
Double Tap to zoom in and out
Tap on an image in the bar at the bottom to directly switch to this image
Menu Options
 |
Tap on this icon to toggle between no overlays, exif and exif + rating/label |
 |
Tap on this icon to change the size of the bottom thumbnail bar or to hide it |
 |
Tap on this icon to share the current image (send via mail or social network) |
 |
Tap on this icon to edit/develop this image |
Image Comparison
Go to menu -> Compare Image
You can compare images side-by-side. Use all regular gestures like Pinch-To-Zoom to check details on both images.
Printing
Go to Menu -> Print
Choose the preffered mode for image scaling:
 |
Scale image to fit |
 |
Crop image to fit |
For printing via Android, a Printer Bridge is required. See the following links below for your printer:
Develop / Editing
|
The develop function includes all major tools for editing images, including cropping and straightening, whitebalance correction and much more. |
Default or Simple Mode
When firstly accessing the editing features, you can choose between a default or simple mode
Simple mode
Is intended for lightweight editing and adjustments. It covers basic options including whitebalance, Exposure, Contrast, Shadows and Highlights, Clarity, Sharpness and Noise Reduction.
This mode is recommended for Smartphones, smaller tablets or for users who just want to do quick edits.
Default mode
Extends the simple mode by offering Whitebalance presets (raw images only), Layer-Based adjustments (Gradient, Circular, Brush, Lasso), Lens-Corrections and Effects
Since the default mode has a lot of options and sliders, it's recommended to use on tablets or devices with larger screen size (at least 7")
Changing modes
You can always switch your mode, even while editing your images. Go to Menu -> Edit Mode
Crop
 |
Use the cropping icon in the menu to switch to the cropping mode |
Use your fingers to adjust the cropped area
Use two fingers to rotate your image
Tap on the ![]() to show additional options
to show additional options
You can now choose a fixed Aspect Ratio, Mirror and rotate the image (in 90° steps) or straighten the image.
Editing templates
Photo Mate supports saving of edits.
This means, all the changes you do to an image (exposure, contrast and even layers) can be stored as a preset for similar or other images.
Furthermore, you can also import or export multiple of these presets to save them or get presets from other users.
Creating a preset
- Switch to the develop mode
- Adjust any image with the values you want to store as a preset
- Tap on the
 in the upper right to show the add preset dialog
 - Follow the steps to store the edits as a preset
Loading a preset
- Switch to the develop mode
- Choose any image which you want to apply the preset to
- Tap on the
 in the upper right to show the choose preset dialog
 - Choose the preset you want to apply
Importing template files
- Download a pmx-template file from www.photo-mate.com/presets or somewhere else (using your device)
- Open Photo Mate and navigate to the download folder
- Tap on the PMX-File in Photo Mate
- Follow the steps to finish import
Exporting template files
You can export all your presets in case you want to share them with other users or copy them to a new device.
- Go to Menu -> Preferences
- Choose Editing on the left
- Tap on Export XMP-Presets
- Check the Notification to find the exported pmx-file
Compare before/after
Go to the "Preview" heading. There are several icons to use:
| Show the whole edited image | |
| While this button is pressed, Photo Mate will show the "before" image | |
| Show the current edits on the left, and the "before" on the right | |
| Show the current edits on the right, and the "before" on the left | |
| Show the current edits on the top, and the "before" on the bottom | |
| Show the current edits on the bottom, and the "before" on the top | |
| Switch the current edits and the "before": All edits you've done will now be stored in the "before" side, and you can do a new edit. Press it again to switch the current edits again with the last stored edits. This allows you to easily compare two seperate edits. |
Customizing the interface
Photo Mate allows you to customize your editing interface.
Histogram
Go to Menu -> Histogram to choose the Histogram mode or to disable it
Top bar
Use the ![]() to unlock the bar from the top.
to unlock the bar from the top.
Editing tools
Long-Tap on an heading (like "Basics") to re-order the tools.
Note: You should close all tools first by tapping once on each of the headings
Sidebar size
Go to the "Tools" heading and use the "Sidebar Size" slider to adjust the width of the tools section
Lens Adjustments
This section covers various information about using Lens-Profiles or doing custom lens-adjustments.
Lens-Profiles
Lens-Profiles provide an easy way to automatically correct distortion, vignetting and chromatic-aberration for common lenses.
Photo Mate ships with the Lensfun Database, which contains several profiles for lenses from various manufacturers.
When you open a raw-file, Photo Mate will read the exif-data and check if it finds a suited lens. If so, the option "Use Profile" is enabled. Activate it to use the automatically detected profile.
Note: When you use a Fixed-Lens camera and edit your raw, this option is may active by default.
Important: When editing jpg-files, your camera may already applied lens-corrections. Do not use this option in such cases.
Using layers
Layers are a great way to make local adjustements to an image.
Open the "Layers" panel and choose the ![]() icon to add a new layer.
icon to add a new layer.
Choose one of the layer types from the list:
- Gradient: A gradient layer. Good for doing large-area adjustments like changing the sky in a landscape image
- Circular Gradient: An ellipse layer. Good for effects like vignette or adjusting skin tones
- Brush: A layer which allows you to draw several points. Good for more complex structures.
- Lasso: A layer which allows you to draw an outline: Good for more complex structures or masking.
- Threshold: Allows you to select a source color. All areas with the same color will be affected. Good for color keying or other effects.
After the layer is added, you will see several adjustment options below.
To delete a layer, select the layer from the list and use the ![]() icon.
icon.
Shortcuts
Image export
This section covers information about the options for image exporting.
Overview
Current Folder / Other Folder:
Choose the destination of your files to export. Use the "Choose Directory..." option to select a directory on your device.
Export to Sub-Folder
if you enter a folder, Photo Mate will create a new folder at your destination location and store the images to export there.
Output-Name
Choose a renaming-option. Use "Set New File-Names..." to create a custom name using the jokers shown at the bottom.
Output-Format
The Format your image should be converted or saved to
- Jpg: Normal jpg image (4:2:2 subsampling)
- Jpg (High Quality): jpg image with 4:4:4 subsampling (full-resolution color-channel)
Note: Exif-Data can just be copied if you export to jpg
Output-Size
Use "Choose Size..." if you want to resize the image
Apply Watermark
Choose a watermark preset from the list you want to apply. Please also see the information in the watermark section
Output-Sharpening
This will post-sharpen the image. Only recommended if you resizing the image.
Existing files
What should happen if a file with the same name exists:
- Skip: These files are skipped (not exported)
- Overwrite: These files are exported and the existing files are overwritten
- Use unique names: The exported files will be renamed (with a number at the end of the name), the existing files remain.
Render XMP settings
If this option is turned on, any editing changes you made to the images are applied to your exported images. In default settings, activating this option also means that real raw-decoding is done (otherwise, just the embedded preview will be exported)
Copy Exif Information to JPG
This will copy all exif-information from your original file (like date, camera, ISO, etc.) will be copied into the exported image.
Save Export Preset
Save all the settings as a preset for similar exports. Enter a name for the preset. If you enter a name which already is a preset, this preset will be updated with the current settings.
Applying Watermarks
You can apply watermarks to your exported images.
To create a new watermark preset, open Photo Mate, go to Menu -> Preferences -> Watermarks. Enter a name for your new watermark setting.
Watermark type
Choose if you want to use a png image as a watermark or a text.
Select watermark
In case you choose a png-image as your watermark type, choose a transparency png file as a watermark. You can use any software to create this file.
Watermark text
In case you choose text as your watermark type, enter the text you want to render. You can use multiple lines as well as special jokers for displaying exif data.
Watermark Position
Set position and size of your watermark. Also use this option to see a live-preview of your watermark.
Keep Aspect Ratio
When activated, the watermark will not be stretched or squeezed.
Watermark is dynamic image
Watermark is a special kind of file. Learn more in this tutorial:
https://www.youtube.com/watch?v=eB0vQf_fcwQ
When done, choose the new watermark under "Apply Watermark" in the export dialog.
Stacking and Stitching images
This section explains how to stack (e.g. HDR) or Stitch (create Panorama) multiple images together.
Stack images
- Select all images you want to stack by long-tapping on the first image to activate multi-select, then tap on all images you want to stack
- Choose Menu -> Combine Images...
- Choose a mode to use (see Stacking modes)
- Press "Start" to start stacking
Stacking modes
| Mode | Usage scenario |
| Stitching (Panorama) | Combine multiple images to a panorama |
| Average (Noise-Reduction) | Averages the pixel values of all images, can be used to reduce noise or to simulate long-exposures |
| Median (Remove Objects) | Uses the median value of each pixel across images, can be used to remove moving objects, but usually needs at least 5 images |
| Maximum | Uses the highest pixel values of all images, can be used for star-trails |
| Minimum | Uses the lowest pixel values of all images |
| Add (Bright images) | Adds all the pixel values of all images, can make a lot of underexposed images brighter |
| Light-Compression (HDR) | Compresses the lights and shadows of all images. Useful if you have an exposure bracketing and want to generate a HDR-Image |
Notes and Tips
Some things to keep in mind when stacking images
- Use the same image format (e.g. raw or jpg) for all images, don't mix them
- Use the same orientation (either portrait or landscape) for all images
- Use the same resolution for all images
- Stitching and Median may crash when using too many images, try to lower the amount of images or use an other mode (like average)
Batch Operations
This section covers operations for multiple images.
Accessing the batch-operations
To access the batch operations, open a folder or the library, long-press on any image you want to apply settings. Now, mark all other images you also want to apply the same settings. If done, choose "Batch Options" in the top menu.
Batch Features
Here are the individual functions explained which can be applied in batch:
- Apply: Apply the choosen rating or label to all selected files
- Remove: Remoe the choosen data from all the selected files
- Set GPS Location: Pick a location you want to geo-tag your images with
- XMP Keywords: Open the Keywords dialog to set all the Keywords you want to apply, as well as IPTC data
- Choose XMP-Template: Choose a XMP-Editing template to be applied (only relevant if you want to export/convert the files later)
Press "Apply" to begin the batch operation.
Preferences
This section explains all the individual, customizable options in Photo Mate.
Accessing the Preferences
While in the Gallery, go to Menu and choose "Preferences..."
Files
Group Raw & Jpg Files
When enabled, the app will look for files with the same name where both a jpg and raw file exists. For viewing, the jpg will be used, for editing, the raw will be used. Changing metadata will affect both files. Deleting an image will delete both files.
Hint: This option does not affect displaying in the gallery. In this case, files are not grouped.
Hide XMP files
When enabled, the xmp files (files containg editing information and metadata for raw files) won't be shown in the gallery.
Use Recycle
Choose this option to use a recycle bin. When you delete files, they're moved to the recycle bin first. You can access the Recycle Bin in the left sidebar in the gallery.
Gallery
Item Count Portrait / Landscape
Number of images per row in the gallery.
Hint: This value can also be changed by using a 2 finger pinch to zoom gesture in the gallery
Show Favorite Folders
When enabled, the left sidebar will always be shown when opening Photo Mate.
Show Ratings / Labels / Edits
When enabled, the metadata of the image is shown in the gallery.
Hint: These option may affect the performance when enabled
Default preview method
This option allows you to choose what happens when you tap an image. You can either directly open or edit it, or always show a dialog to ask for it.
Render folder content
When enabled, all folders will show small thumbnails inside with images they're containing.
Library
Automatically add images
When enabled, all images you view or open will be added to your library
Keep missing files
When you disable this option, Photo Mate will regulary check which files are removed and also remove them from your library
Editing
Raw-Cache duration
Choose the number of days Photo Mate will keep previews of raw-files (for editing only). Using 0 will disable the cache.
Full-Size Preview
When enabled, Photo Mate will edit the full-size resolution for previewing. Only affects editing raw files. May causes crashes when your device has too less memory.
Left-Hander-Optimized
When enabled, the toolbar will switch position so it's easier to access for left-hander.
Lock orientation
Locks the orientation to landscape in the editing mode.
Choose your lenses
You can select all the lenses you own here, so when you choose a lens profile, you'll only see your lenses.
Export XMP presets
Exports all your current xmp presets. Useful if you want to switch to an other device or share your presets online.
Watermarks
Performance
Displaying
Maximum screen brightness
Choose the screens where you would like to always have the full screen brightness
Use Immersive Mode
When enabled, the android navigation bar and status bar will be hidden to have more real estate for Photo Mate.
Double Tap Zoom Factor
Control the zoom factor when double tapping on images to zoom in (e.g. 100% or 200% zoom)
Choose language
Use a language different from your current
Custom Exif Display
Use a different exif display layout (the exif information you see on top on the image).
Thumbnail Scaling
Choose whether to crop thumbnails to let them all have the same dimensions or to fit the dimension to the image size
Menu-Appearance
Choose if you always want to see text explanation for all menu items, or just see symbols, or use the default (sometimes on, sometimes not, recommended)
Render XMP settings
When enabled, edits you've done to images will be displayed everywhere, even when you view the still un-exported image
Hint: May affect performance when enabled
Compatibility
Set Label-Names
Choose the names for the different colors of your labels. We recommend to use the same names as you use in your desktop software.
XMP Data inside JPG
When enabled, Photo Mate will store editing and metadata information inside the exif data for jpg files. Disable it if you don't want Photo Mate to alter your original files.
Decoder
Raw Decoder
Enable or disable the raw decoder.
Raw Decoder Quality
Choose the bayer interpolation mode. Recommended modes are PPG or AHD.
Performance
This section covers tips and tricks to improve the performance of Photo Mate.
General
Some general tips to improve the overall performance of the app:
- Use fast (Class 10 or U3) external memory cards
- Disable any energy saving of your device and enable performance mode
- Close background services if possible
- Try to keep your device cool to prevent downclocking of the cpu
Gallery
How to improve the speed of the gallery:
(Settings can be found under Menu -> Preferences -> Performance)
- Enable "Use embedded exif thumbnails"
- Disable "Rotate thumbnails"
- Disable "Raw-Decode thumbnails"
- Disable "Render XMP Settings" (Preferences -> Displaying)
Viewing
- Disable "Always Full-Size Preview" (Preferences -> Performance)
- Add folders you want to view to the library
Editing
- Set a lower Preview-Quality (Heading "Preview")
- Disable the histogram
- Export images in smaller sizes
- (Exporting only) Set a lower raw-decoder quality (Preferences -> Decoder)
FAQ
This section covers some Frequently asked questions and answers.
After editing an image, it still looks the same in the gallery
All edits you do on an image won't touch the original image, but are stored in a sidefile (raw images) or the exif data (jpg images). The edits are just getting applied when you export the images.
If you always want to see the edits you've done, you can enable this by going into Preferences -> Displaying -> Render XMP settings.
Note: This will reduce the performance of browsing and viewing significantly, so only use this if you actually need it.
Does Photo Mate perform actual Raw decoding?
By default, Photo Mate does not decode raw data and only reads the embedded jpg-file of your Raw-Image when viewing images.
However, when you're going to edit an image, Photo Mate will decode the actual raw-data.
Here are some of the differences between actual decoding and reading embedded jpg data:
| Embedded-JPG | Raw Decoding | |
| Speed / Performance | Fast | Slow |
| Size | Not always full-size | Full-Size |
| Quality | Good, but already processed | Good, Unprocessed |
| Dynamic Range | Limited | Full Camera Range |
| Editing Capabilities | Small | Large |
Editing and Exporting Time
A common question asked by users is how long it actually takes to edit and convert raw-images on a device like a tablet. Unlike a "real" pc, tablets and smartphones have significantly weaker hardware, although on first sight it may looks like they also delivering desktop-class performance, but that's not true. Since these hardware is made for low power-consumption, passive cooling and small form-factors, you have much lower computing power than on any desktop pc (even low-end desktop pc's).
However, the question is still interesting, especially if you want to convert a lot of images. Raw-Image Processing is usually not a lightweight task, if you used software on your pc before, you probably already noticed that even desktop-pc's need some time to handle and edit these files.
So this page shows a chart for processing times on common devices. All these measures where taken manually, so they're may not perfectly accurate.
The measured time includes the full image decoding (Raw Image, Canon CR2), processing and saving as jpg-file in full resolution (including exif-data).
The "Basic" option includes: Whitebalance-Changes, Exposure, Contrast, Vibrance, Clarity
The "Advanced" option includes: Everything from Basic + Luminance + Color-Noise Reduction + Lens-Profile Adjustments (Vignetting, Distortion and Chromatic Aberration)
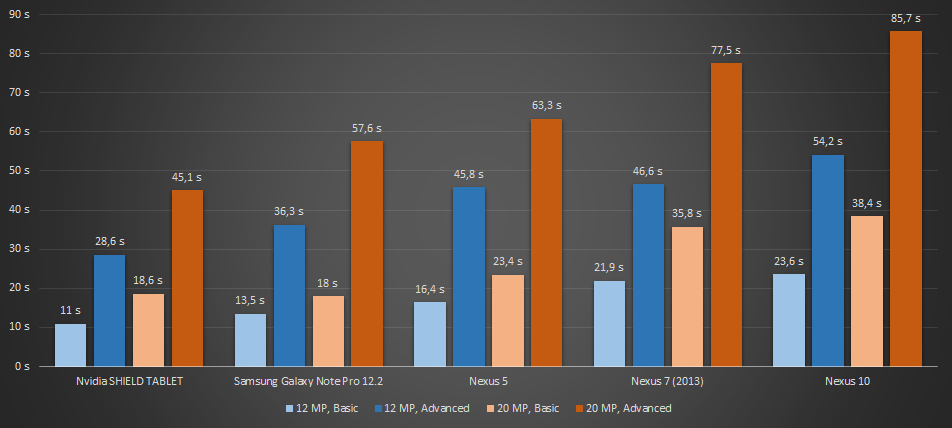
All Measurements were done using Photo Mate R2 2.5 (Release Version)
How can I create Auto-Lens profiles?
Photo Mate R2 1.7 introduces Auto-Lens Correction features.
Vignetting (light falloff at the borders of the image), Chromatic Aberration (Red/Cyan color-fringing) as well as Lens-Distortion can be corrected automatically.
When you open an image and Photo Mate says "Lens Profile found" (Tab Lens-Adjustments), you probably don't have to do anything. Your Lens is already supported.
Depending on your lens, some of the features (Vignetting/CA/Distortion) may not supported, though. In this case, you can still refer to this tutorial.
Case 1: Photo Mate says "Lens Profile not found"
There are 2 variants in this case:
a) The "i"-icon can be selected
Press on it, and see if you can find the lens you shot with in the list. If yes, please send us a raw-file and the actual lens-name of the lens you was using via mail.
Check this by using Photo Mate, open the image and go to Exif-Data. If you see your Lens information (just the Focal-Length is not enough!), contact us. Otherwise, check the Exif-Information from your raw-image with some external software. If there is no Lens-Information, you always have to select the Lens manually.
If not, read ahead at "Creating a new profile"
b) The "i"-icon can't be selected
In this case, Photo Mate could not find a camera-profile. In this case, we also need the raw-file and information about your camera (if you have some). Otherwise we'll look ourselfs online.
Case 2: Photo Mate says "Lens Profile found"
Then set the checkbox "Use Lens-Profile". See what parameters are supported. If you can see that some are missing (like Chromatic Aberration Red/Cyan sliders are still available or Vignetting options are still available) you can read ahead at "Creating a new profile"
Creating a new profile
In case your lens is currently not supported or some important corrections are missing, you can help us supporting your lens in a future release.
First, please go to wilson.bronger.org/lensfun_coverage.html and check if your lens or the corrections are really not supported. Otherwise please contact us first!
Since Photo Mate supports the Lensfun-DB data, you can use their tutorials to create profiles. Here are some links to the tutorials.
Create or Edit the XML-File
Put all the values together in a XML-File like described in the tutorials. If you edit a lens, we recommend you extend the current lens-profile and edit it.
Please also make sure that you add your camera's crop-factor. You can find it in the xml-files, simply search for your camera.
Send the XML-File
You've got two options:
- You can send it directly to the maintainers of the Lensfun-Project. See the information here: lensfun.sourceforge.net/calibration/
- If you mainly need the profile in Photo Mate and want to make sure that you've it already in the next version, send the profile directly to our support: #mail
Please, just use one of the options! If you send it to us, we'll forward it to the project, so you just need to send one mail.
How to convert raw files to jpg files
- Open the folder in the gallery
- Press the menu button. This is either the one on your device or in the upper right corner on tablets.
- Select the option "Export all images..."
- Set as target-format "JPG"
- If you want to quick-convert the raw-files, disable the "Render XMP-Settings" (this will only read and convert the embedded jpg of your raw-files)
- Start the convert process
Keywords:
How to import images from an usb-connected camera
- Connect the camera to your device
- Turn on your camera
- Android should come up with a list of available apps. Choose Photo Mate to handle the event.
- If there doesn't come up a list but directly an app (like the gallery for instance), go to the settings
- Choose Apps and select the application which came up from the list
- Choose the button "Clear defaults"
- Disconnect your camera and restart at the beginning
Keywords:
SD Card on Android KitKat
Since Android 4.4 ("KitKat"), external apps are not allowed to write on any external storages (External SD-Cards, USB-Storages, etc.)
For Photo Mate, this means you may view and even edit images on that storages (when you edit, the XMP-Data is stored in the internal Photo Mate folder), but exporting images to that location is not possible. What if you want to save to your external storage, anyway?
- If you're using Lollipop, please access your SD-Card via Photo Mate. It will ask you to follow necessary steps to re-activate the writing permissions.
- If you don't have a rooted device nor lollipop and don't want to root it, you can create a folder-structure on your external storage which should look like:
Photo Mate R3: Android/data/com.tssystems.photomate3
Photo Mate R2: Android/data/com.tssystems.photomate2
You can then use this folder and also write to this folder in Photo Mate. Please use your system's file explorer to create this folder first - If you have a rooted device, you can find several tools to unlock this limitation.
Important!
If you store your files in the external app directory, make sure you backup this directory before you uninstall the app! Android will delete this folder when you uninstall Photo Mate!